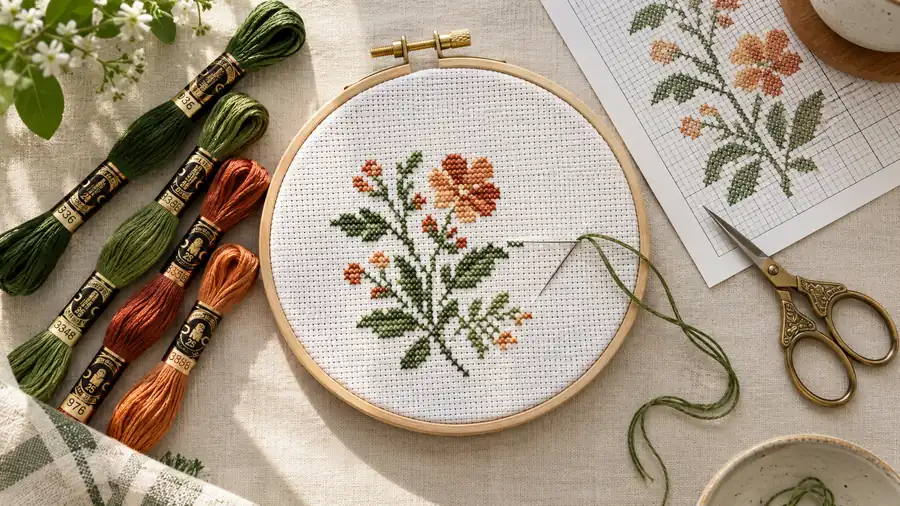
If you have ever wanted to transform a blank piece of fabric into intricate, colorful wall art, counted cross stitch is the most forgiving and satisfying needlecraft you can pick up. Unlike freehand embroidery—which demands years of muscle memory to master French knots, satin stitch tension, and fluid curve drawing—cross stitch is built on a precise mathematical grid. Every single stitch is composed of uniform, crossed diagonal threads that come together like analog pixels.
If you are wondering how to cross stitch for beginners without getting tangled in messy knots or feeling intimidated by sprawling multi-page patterns, you have come to the right place. In this definitive guide, we break down everything from setting up your very first hoop to mastering clean starting techniques, reading charted symbols, avoiding common beginner traps, and creating custom beginner-friendly charts with modern AI.
1. The Essential Beginner Toolkit
You do not need a specialized craft table or a massive investment to begin. In fact, keeping your starter kit focused makes learning significantly easier. Here are the five non-negotiable tools:
| Tool | Recommended Specification | Why It Matters |
|---|---|---|
| Fabric | 14-count White or Natural Aida | Woven in distinct square blocks with visible holes; forgiving on the eyes. |
| Needle | Size 24 Tapestry Needle | Blunt rounded tip glides between weave squares without piercing or splitting threads. |
| Embroidery Floss | DMC 6-Strand Cotton Skeins | Industry-standard colorfast stranded cotton; easy to separate and color-code. |
| Hoop | 5-inch to 7-inch Wood or Plastic | Maintains drum-tight fabric tension for uniform, flat X-stitches. |
| Embroidery Scissors | 3.5-inch Stork or Snip Scissors | Sharp points trim threads flush to the fabric back without fraying. |
Why Needle Choice Matters
Never use standard household sewing needles for counted cross stitch. Sharp sewing needles pierce right through the woven fabric threads of your Aida cloth, causing uneven hole spacing and frayed fibers. A blunt tapestry needle naturally slides through the existing openings in the fabric grid, ensuring every stitch sits squarely in its allocated cell.
2. Anatomy of Embroidery Floss: The "Two-Strand" Rule
A standard skein of DMC stranded cotton contains 8 meters (8.7 yards) of thread composed of six individual strands loosely spun together.
[!IMPORTANT] A common beginner mistake is threading all six strands onto the needle at once. For standard 14-count Aida cloth, you will almost always separate and stitch with just 2 strands. Stitching with all six strands jams the holes, warps the fabric, and makes pulling the needle agonizingly difficult.
How to Separate Strands Without Tangling (The Stripping Method)
Pulling two strands directly from a cut length often results in a snarled bird's nest. Instead, follow this foolproof "stripping" method:
- Cut a length of floss about 18 inches (45 cm) long—roughly the distance from your fingertips to your elbow. Threads longer than this twist excessively, accumulate friction, and thin out before you finish the strand.
- Hold the 18-inch cut piece near the top between your thumb and index finger.
- Gently pinch a single individual strand with your other hand and pull it straight up and out.
- The remaining five strands will scrunch together like an accordion. Do not panic—as soon as the single strand clears, the bunch drops down completely straight.
- Repeat the process to isolate a second strand, then smooth the two single strands together side by side.
3. Preparing Your Fabric and Finding the Center
Preventing Frayed Edges
Woven Aida fabric has raw edges that can unravel as you handle your hoop. Before hooping, protect the border using one of these three simple methods:
- Painter's or Masking Tape: Fold blue painter's tape or low-tack masking tape over all four raw edges.
- Pinking Shears: Trim the perimeter with zigzag pinking shears to halt running fray lines.
- Fray Check: Dab a thin line of liquid seam sealant along the cut threads.
Finding the Fabric Center (The Quadrant Fold)
Almost every cross stitch pattern is designed to start from the center point. This guarantees your design will be centered in your hoop or frame without running off the cloth edge.
- Fold your fabric in half horizontally.
- Fold it in half again vertically.
- Crease the folded corner lightly with your fingers or mark the exact center intersection with a pin or water-soluble fabric pen.
- When you open the fabric, that center hole corresponds directly to the intersecting black arrows on your chart.
       Fold in Half               Fold in Quarters           Center Located
   +-------------------+        +---------+                 +-------------------+
   |                   |        |         |                 |         |         |
   |                   |  --->  |         |          --->   |----+----+----+----|
   |                   |        |         |                 |         • (Center)|
   +-------------------+        +---------+                 +-------------------+
4. The Cleanest Starting Technique: The Loop Start
Traditional crafting books often advise tying a knot at the end of your thread. Never tie knots on the back of counted cross stitch. Knots create unsightly lumps that press against glass frames, cause thread bumps on the front surface, and can easily pop right through the open weave of Aida.
If you are using an even number of strands (such as 2 strands on 14-count Aida), the Loop Start is the gold standard:
- Instead of cutting two 18-inch strands, cut one single strand 36 inches long.
- Fold that strand in half, bringing the two cut ends together. You now have two loose cut ends at one side and a clean fold loop at the other.
- Thread the two cut ends through the eye of your needle. The loop hangs at the long tail.
- Bring your needle up from the back of the Aida through the bottom-left hole of your starting square, leaving about an inch of the loop tail hanging loose on the backside.
- Push the needle down through the top-right diagonal hole (
/). - Turn your hoop over to the back, slide your needle directly through the thread loop, and gently pull snug.
Your thread is anchored permanently with zero bulk, zero knots, and pristine backside flatness.
5. Step-by-Step Stitching Methods
A complete cross stitch consists of two intersecting diagonal stitches that form an 'X':
- First Leg (Half-Stitch): Bottom-left to top-right (
/) - Second Leg (Crossing-Stitch): Bottom-right to top-left (
\)
   Step 1: Half Stitch (/)          Step 2: Cross Completed (X)
      2                  .              2                  4
       \                                 \                /
        \                                 \              /
         \                                 \            /
          .                  1              3          .
   (Bottom-Left to Top-Right)        (Bottom-Right to Top-Left)
Depending on your pattern layout, you will switch between two classic approaches:
Method A: The Danish Method (Best for Solid Rows)
The Danish method is the fastest, neatest way to fill continuous rows or blocks of identical color.
- Work from left to right, stitching a row of consecutive bottom half-stitches (
/ / / / /). - Once you reach the end of the row, work backward from right to left, crossing over each stitch with a top diagonal (
\ \ \ \ \).
Benefits: Saves thread, maintains identical tension across all stitches, and keeps the back of your fabric flat and tidy.
Method B: The English Method (Best for Isolated Details)
When stitching scattered motifs, vertical single-column lines, or solitary accents, finish each cross stitch completely (/ then \) before moving your needle to the next square.
The Golden Rule of Cross Stitch
Whichever diagonal direction you stitch first, keep it consistent across your entire project.
If your bottom half-stitch slants bottom-left to top-right (
/), then every single stitch on your canvas must have/underneath and\on top. When all top legs slant in the exact same direction, light reflects off the cotton thread uniformly, giving your finished embroidery a smooth, lustrous, professional sheen.
6. How to End a Strand Neatly
When your thread runs down to about 3 to 4 inches, it is time to park and secure it:
- Bring the needle to the back side of your fabric after completing your final cross.
- Slide the needle under the backs of 3 to 5 adjacent existing stitches.
- Pull the thread through snugly without pulling so hard that you distort the front stitches.
- Snip the thread tail closely with your sharp embroidery scissors. Friction between the tightly woven cotton strands will permanently hold the thread in place without slipping.
7. Reading a Cross Stitch Pattern Like a Pro
A cross stitch chart is a visual map where each tiny square represents one full 'X' on your fabric:
- 10x10 Grid Lines: Thicker grid lines group stitches into 10x10 blocks, matching standard counting conventions.
- Center Arrows: Small black triangles at the top, bottom, left, and right borders point directly to the canvas center lines.
- Symbol Legend: Every symbol in the chart corresponds to a specific DMC color code. For example, a black circle (
•) might represent DMC 310 (Black), while an open star (★) represents DMC 666 (Bright Red). - Fractional Stitches and Backstitching: True beginner patterns avoid partial stitches (quarter or three-quarter stitches) and backstitched outlines, sticking strictly to full cross stitches.
8. Top 5 Beginner Mistakes and How to Avoid Them
1. Thread Twisting
As you stitch, repeatedly passing the needle through fabric naturally twists the floss, causing knots and uneven coverage.
- The Fix: Every 10 to 12 stitches, drop your needle and let it hang freely below your hoop for 5 seconds. The thread will spin and untwist on its own.
2. Excessive Stitch Tension
Pulling thread too tightly warps the woven Aida squares, leaving gaping holes around the stitches and creating a puckered fabric surface.
- The Fix: Pull each stitch until the thread sits comfortably flush against the cloth surface. Treat cross stitch like laying down soft ribbon, not tightening a shoelace.
3. Jumping Long Distances on the Back
Carrying a dark thread across 2 inches of blank Aida on the reverse side saves time, but that dark strand will show right through white fabric holes from the front and easily snag on needles.
- The Fix: If the next stitch of the same color is more than 4 or 5 squares away, end your thread and restart fresh in the new section.
4. Leaving Projects Tight in the Hoop
Leaving your fabric clamped under high tension in a wooden hoop for weeks can create permanent hoop burn creases and stretch the grain.
- The Fix: Loosen the brass screw and take your fabric out of the hoop at the end of long crafting sessions or when stepping away for several days.
5. Starting with Complex "Confetti" Charts
Many beginners purchase downloadable charts that look gorgeous on screen but contain dozens of isolated single-pixel stitches ("confetti"). Switching colors every two stitches leads to frustration and burnout.
- The Fix: Choose beginner-friendly designs with large blocks of solid color and under 10 total thread shades.
9. Washing, Pressing, and Displaying Your Finished Piece
Once your final stitch is in place, give your needlework an heirloom-quality finish:
- Gentle Lukewarm Soak: Fill a clean basin with lukewarm water and a drop of mild liquid castile soap or gentle textile wash. Soak your piece for 15 minutes to release natural skin oils and hoop creases. Rinse thoroughly in cool water—never wring or twist.
- Towel Roll: Lay the wet piece flat between two clean, dry white bath towels and roll it up like a jelly roll to press out excess moisture.
- Face-Down Ironing: Place a fluffy towel on your ironing board. Lay your cross stitch face-down on the towel, cover the back with a thin cotton pressing cloth, and press gently with a dry or warm iron. Pressing face-down ensures your raised X-stitches sink softly into the towel pile instead of being flattened into dull pancakes.
- Framing Options: Mount your piece directly inside an attractive wooden hoop with felt backing, or stretch it over acid-free foam core board for custom glass framing.
10. The Modern Shortcut: Generate Beginner-Friendly Patterns with StitchCraft
Finding high-quality beginner patterns that reflect your personal tastes—a minimalist pet portrait, a favorite travel landmark, or a custom meme—used to mean settling for generic starter kits or struggling through noisy DIY chart software.
StitchCraft Studio transforms how you approach cross stitch from day one:
- Turn Any Photo or Graphic into a Counted Chart: Simply upload your image and let StitchCraft convert it into a crisp, gridded pattern.
- One-Click Confetti Smoothing: StitchCraft features a dedicated chart-smoothing engine that merges scattered stray pixels into cohesive, easily stitchable color blocks tailored specifically for beginners.
- Strict DMC Floss Budgets: Cap your palette to 4, 6, or 10 colors. StitchCraft computes true color matches in perceptual CIELAB space, mapping directly to genuine DMC stranded cotton numbers.
- Printable PDF Charts with Shopping Lists: Export high-contrast symbol charts with exact skein estimates, so you walk into the craft store knowing precisely which DMC numbers to purchase.
You don't need to spend hours searching for the "perfect" beginner kit. With StitchCraft, you can design a clean, manageable, deeply personal cross stitch pattern in under two minutes.
Ready to start your first cross stitch journey? Head over to StitchCraft and create your own beginner-friendly custom pattern with instant DMC color matching and free printable PDF exports!